General sample preparation
Make sure to use #1.5 coverslips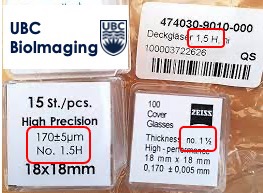
- All lenses in optical microscopy suffer from a spherical aberration. But most commercially available objective lenses are corrected by coverslips that are 170μm thick. The correct coverslips for high resolution microscopy are #1.5 coverslips.
- Dishes and multi-well plates – for best results use dishes or plates with #1.5 glass coverslip bottoms. MatTek and ibidi are examples of companies that sell these products
Use a mounting media to reduce bleaching (if possible when using coverslips and slides).
- Our users have had good results with Prolong Gold, Prolong Diamond, Vectashield and Fluoromount, among others. Note that Prolong Gold is not appropriate for use with fluorescent proteins (i.e. GFP, RFP, etc.), and Vectashield is not good for AlexaFluor 647.
Place sample on the coverslip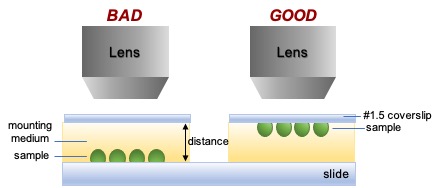
- Placement on the coverslip enables direct imaging of the sample, rather than imaging the sample through variable amounts of mounting/imaging medium.
- Most lenses are designed to image at the coverslip, not far from the coverslip. Thus, resolution may be degraded or the distance may be too great to focus.
- To mount the slide on the coverslip: place the coverslip on a lab bench, add mounting medium, angle the slide above the coverslip, and lower slowly until the coverslip mounts. This will minimize bubbles that refract light and cause artifacts.
Sealing the coverslips
- This is important to hold the sample in place, to prevent dryness, oxidation and hardening, and to preserve 3D information in the sample.
- After mounting your sample, wipe off the excess mounting, and seal the coverslips to the slide with nail polish or melted wax. Give your nail polish time to harden before imaging.
- Melted wax can be used when your samples are sensitive to chemical in nail polish and/or for quick sealing. Melted wax is in the heat block at the prep room of BIF.
- If coverslips are loose, this can cause mounting media to deposit on the objective making it difficult to image samples and even damage the objective.
Fixed or live sample staining
Selecting imaging reagents
- Selecting bright and stable fluorophores, fluorescent proteins (FPs), and stains is a critical part of experimental design. Always verify that the reagents match the illumination profile of the microscope.
- Newer fluorophores tend to be brighter and more photostable than older ones (e.g. AlexaFluor 488 is better than FITC).
- There is more autofluorescence in the blue-green region of the spectrum. If your tissue is very autofluorescent, staining in the red or far red may be advantageous.
Choosing a secondary antibody
- When choosing a fluorophore, select based on the illumination profile or the laser lines of your microscopes.
- The illumination profile of Olympus BX53 wide field light/fluorescence microscope in BIF; Blue (DAPI, Hoechst), Cyan (CFP), Green (GFP, Alexa 488, Cy2), Yellow (YFP), Orange (Cy3, Alexa 555, Propidium iodide), and Far Red (Cy5, Alexa 647).
- The laser lines on Olympus FV1000 confocal/multiphoton microscope in BIF; 405, 473, 515, 559, 635nm laser lines and tunable pulsed Ti:sapphire laser (700-1000nm).
- The laser lines on Perkin Elmer spinning disk confocal microscope in BIF; 405, 440, 488, 515, 560, 640nm laser lines.
Live cell sample preparation
- In selecting a fluorescent protein, consider photostability, maturation time, and quantum efficiency. Replacing an old fluorescent protein with a more modern one may improve signal stability over time.
- Cell culture media; It need to be confirmed that the cell culture media is non-fluorescent by imaging an area of the sample dish where there are no cells.
- Temperature; Cells must be maintained at a suitable physiological temperature to maintain a healthy state. Temperature control plates are available for Olympus FV1000 confocal microscope and Perkin Elmer spinning disk confocal microscope in BIF.
Tips for users
- Start small with a minimally complex experiment.
- Turn on the environmental chamber or thermo plate to make the optimal imaging condition.
- Avoid short wavelengths that cause the most cellular damages.
- Acquire as few z slices as possible to obtain the information needed.
- Minimize the number of timepoints acquired. (consider the dynamics of the visualized event).
- Acquire fields of view that are sufficiently far apart that they are not exposed to light from an adjacent field of view.